Update: 4 Dec 2020
This article was originally posted on 11 Apr 2020. As of 4 Dec 2020, the challenge of finding saved recordings has mostly been solved.
In the latest version of the Voice Memos software, you can now right click (or control left click) on a recording, then from the Services menu option you will see Show In Finder as a selection. So, you can find your recording and copy it to another location if desired.
Note that it’s best not to move or delete the original recording unless using the Voice Memos program to do so. Otherwise, the Voice Memos program may list it but be unable to find it.
Below is the original support document from 11 Apr 2020.
# # #
An iPhone or iPad can be used to make fairly high quality audio recordings by using the Voice Memos app. When you’re on one of these iOS devices, it’s easy to save a recording as an audio file to various storage destinations.
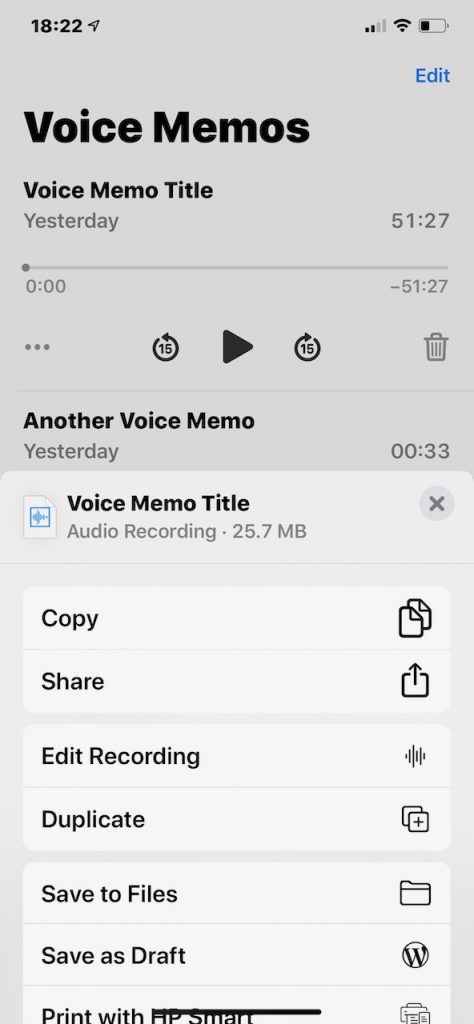
You can tap on the three dots to bring up options that include the ability to Save to Files as shown below. Note that in the example below, the recording name is “Voice Memo Title,” but on your device it will be the title of your recording.
Voice Memos on Apple Mac Desktop or Laptop
What if you want to use an audio recording on your Apple Mac desktop or laptop computer?
The Voice Memos app on MacOS does not have the Save to Files option. Under the share icon, your choices are Mail, Messages, AirDrop, Notes, a few suggested contacts to share with and a More to adjust share settings.
Also missing is the option to “Reveal in Finder” or “Open in iTunes” or “Use in GarageBand.” These would all be good options that one expects to find since they exist in other Apple programs.
If your desktop or laptop computer are synchronizing using iCloud with the files, apps, and data on your iPhone or iPad, then recordings on those mobile devices will show up on the computer in the Voice Memos program.
To get to your recordings, you must carefully follow these steps:
- Click on your desktop to ensure that the Finder menu is active – and not the menu of any other program.
- Hold the option key on your keyboard and with that key held down, click on the Go menu and select Library from the list.
- You will be viewing the Library folder located in your user home folder (e.g. Macintosh HD > Users > Your Name > Library.
- Click on the Application Support folder to reveal its contents.
- Scroll down to find the com.apple.voicememos folder and click on it to reveal its contents.
- Click on the Recordings folder to reveal its contents.
- At this point you really need to be careful not to delete, move, or rename any of the files. If you do, it will mess up the Voice Memos app listing of recordings.
- Based on the date (year month day – YYYYMMDD) find the audio file you are interested in. It should end in .m4a as the extension for the file.
- Copy the audio file to your desktop or preferred location. There are two ways to copy:
- You can copy the audio file by holding the option key and dragging the file to your preferred location, or
- You can copy the audio file by clicking once to select the file, then holding the command key and c key on the keyboard the file will be copied. Then click once in the designation folder or your desktop, and use command and v key to paste it in a new location.
Now you can work with the copied audio file by brining it into GarageBand, iMovie, Audacity, or other program.